Tuesday, January 28, 2014
Steinway 250281 Soundboard Built
A soundboard begins as a pile of very high quality Sitka Spruce from Washington state. It is perfectly clear, straight grained, and quarter sawn. The wood used is only the best of the best, and I might add, very expensive. The individual boards are laid out according to grain direction and overall size needed for the panel that will be constructed.
I then glue the boards together in widths of about 12" so I can plane them to the desired thickness in my thickness planer. This board was planed to 11/32".
The five panels are then glued into one large panel.
Using the old board as a pattern, the new board is cut to shape, but slightly oversized.
Meanwhile the rib stock is cut and shaped to fit precisely in the notches cut into the rim of the piano. The ribs are also quarter sawn spruce.
The spruce panel is then carefully hand fit into the rim of the piano. The goal is to match the shape of the board to the shape of the rim, with no gaps between the edge of the panel and the inside of the outer rim.
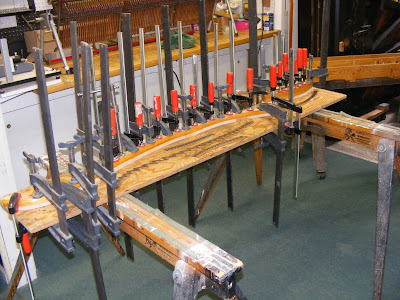
The ribs are indexed to the new soundboard, and then glued to the soundboard panel. The wood is dried to 5%EMC. The pneumatic press exerts 100PSI pressure to the glue line. The board is left in the press overnight.
Project completed. The old beside the new. Next up- bridges to be recapped, and new pinblock installed. These projects will take a few weeks, so see you then.
Sunday, January 19, 2014
Steinway A 280251
I have recently begun a new project. This will be a total restoration. The first step is to remove all case parts, and then the strings, and finally the soundboard, bridges and pinblock. Then the real work begins.
Case parts are removed, measurements are taken and recorded.
Strings removed
Cast iron plate removed with winch.
Sounding Board removed. It literally has to be broken out of the piano. It will be reconstructed to use as a pattern for the new board.
Bridges are removed from sounding board. The bridges will be recapped, using the original bridge bodies.
Pinblock removed. The original is glued and doweled into the case. Not an easy job to remove.
Saturday, December 14, 2013
Steinway S 334968 Completed
The Steinway returned from the refinishers several weeks ago. I have been working hard to get the project completed before Christmas. Today was to be a snowy day, so I canceled my tunings for the day and instead have been in the shop, and have completed the project.
Piano being strung after returning from Refinisher
Completed!
Thursday, September 12, 2013
Steinway S Final Soundboard Work
Completed bridges installed on new soundboard.
Radius' cut on rib tops.
Ribs sanded
Final finish applied to soundboard bottom.
Completed soundboard glued into piano rim.
Tomorrow I will add trim pieces to the top of the board, and apply the final finish. The piano will then be ready to send to the refinisher.
Wednesday, September 4, 2013
Steinway S 334968 Bridge Work
A lot of time has been spent recapping the bridges. First the old tops of the bridge are cut off, and new caps are clues to the original bridge body. Then the bridges must be aet to their proper height. This is called setting the bearing. Then the new caps must be planed to their proper thickness, and finally the notches and pins need to be added.
New Bridge Caps Installed
Setting Bearing
Planing Bridge tops
Notching Bridge Caps
Completed Bridges, Ready to Glue Onto Soundboard.
Thursday, August 8, 2013
Tuesday, August 6, 2013
Steinway S #334968 Soundboard Ribs
The soundboard ribs are notched into the shelf of the rim where the completed soundboard will be glued. I take great care in individually fitting each rib to the piano rim shelf. The ribs are also dimensioned to the proper width and thickness. When this is completed, they are indexed and prepared for gluing onto the spruce panel.
Subscribe to:
Posts (Atom)


