Monday, August 31, 2009

Baldwin F Ribs


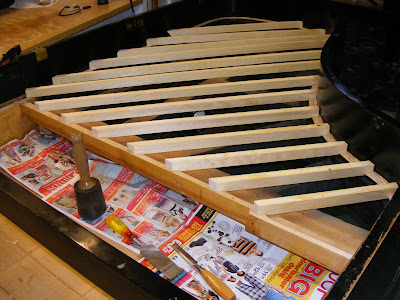
Some steps of making a soundboard are invisible after the board is built. Fitting the ribs to the rim of the piano is one of those details that is unseen, but I believe is important in achieving a good sound when the board is completed. I start by rough cutting the length of the ribs. The original rib dimensions are usually duplicated. Then the width of the individual ribs are cut and planed smooth. Now the exact length of the ribs is determined by hand fitting each to the notches in the rim of the piano. Next a radius is cut on the face side of the rib. Finally, the ribs are cut to their proper thickness and planed smooth. At this point, the reliefs are cut out of the ends. The cut outs are saved to use as cauls when pressing the board. A final hand fitting of the ribs into the rim is done, checking all aspects of the desired dimensions. This attention to detail is one step in recreating a great sounding piano soundboard.

Saturday, August 29, 2009

Mason & Hamlin BB Board Out


With two soundboard jobs going at once, there will be a bit of repetition in my reporting of shop work. The Mason board came out fairly easily (but not without some effort) because the ribs are not notched into the liner very far, about 1". I will be changing this as I feel it is important for the ribs to have more support that comes with a deeper notch, about 2 1/2". More on that on a later post.

Thursday, August 27, 2009

Baldwin F Rim Cleaned


After the old board is removed, the old glue and wood residue must be removed. This is accomplished by first removing the large pieces of wood reside with a chisel. Care must be taken not to damage the rim shelf. Then a solution of wallpaper remover and water is applied and allowed to soak for about 30 minutes. The softened glue and remaining wood fibers are then removed with a wood scraper. If the glue used to glue the board in is not water soluble, the clean up job is much more difficult.

Wednesday, August 26, 2009

Baldwin F Soundboard Out


After drilling indexing hole through the board into the rim, I am ready to remove the old soundboard. The tools for removal- a sledge hammer and a pry bar. Yep, nothing dainty about this job. The board is glued in around it's entire perimeter, and needs to be broken free. I start by hammering at each accessible rib/rim junctures. Then I pry the front of the board loose. This is the easiest spot to break loose as the liner is fairly thin. Then I work around the sides until the board breaks free and can be pushed up and out of the piano.

Monday, August 17, 2009

Mason & Hamlin BB Soundboard Crown

The question of the day- Wow, the board on this piano looks pretty good. I can see the crown. Maybe we shouldn't replace it. My answer- yes we should! Looks can be deceiving. I'd like to explain why. First off, the piano was built in 1963, making the piano 46 years old. My rule of thumb from my experience of replacing over 60 sound boards and repairing at least that many, is that any board over 40 years old should be replaced when the piano is rebuilt. My logic is that glue joints weaken with age. On this piano a soundboard steel can be pushed into the side of the rib showing a weakening glue joint.


The next issue with this piano are the bridges. The bridges definitely need recapped. Quality bridge recapping is impossible with out removing the bridges from the sound board. Gluing maple to maple requires a very precise joint and about 200psi clamping pressure, which is impossible to achieve while mounted to the soundboard. Removing the bridge from the board is messy, especially with the board still in the piano. You are dealing with screws hidden by beams, and doweling into the ribs, not to mention damage to the spruce panel as the bridge is removed.


Finally...the deception. The crown on this piano is not a natural crown, but a forced crown. The pictures show how the rim is crowned on the straight side and on the stretcher. Therefore the board has to have a crown, regardless of the condition of the board. Also the rim angle is nearly double what most quality pianos have. On this Mason it is a 1 1/2 inch rise over 4 feet.


In conclusion, I feel it would be unwise to not replace this board. If it is not replaced, I will not attempt to recap the bridges, but rather recondition them. Are the financial savings worth the risk of failure? I think not.

Saturday, August 15, 2009

Baldwin F #147009 Tear Down


For the second time this week I find myself tearing down a piano. This one thankfully happened in my shop. It is a sub-contract job, and will include new soundboard, new pinblock and new strings with some other minor repairs. With these two rebuilding projects going and also a heavier tuning schedule (I start Messiah College next week- about 35 tunings) the next weeks and months will prove to be very busy.

Wednesday, August 12, 2009

ESU M&H BB Tear Down


Today I was joined by fellow technicians Chris Soliday and Greg Graham in tearing down the Mason and Hamlin at E. Stroudsburg University. The piano needs to be top ended to fit in the elevator, which is an almost possible task as the piano is very heavy when in one piece. The solution- disassemble the piano in the classroom and put it on the elevator in pieces. As a result, the three of us fairly easily handled the piano and got it into the elevator. This will mean that I will need to string the piano in the class room when it is returned. That will probably take a little more time than tearing down!

Tuesday, August 4, 2009

Kawai GS40 Completed


Today I was able to complete the work on the GS40. The bass strings finally arrive last Friday. After they were installed, the remaining dampers were installed and regulated. The final step was reinstalling the case parts that were removed to accommodate removal of the plate. The action was regulated several weeks ago, so now all that needs to be done before delivery is several more tunings as the strings stretch and settle into pitch.