Thursday, April 30, 2009

Steinway O Soundboard Trim Installed


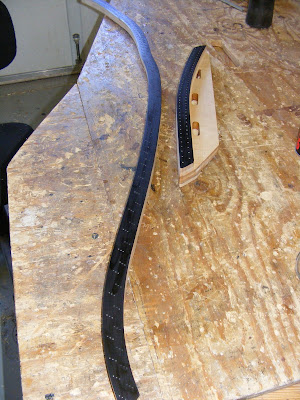
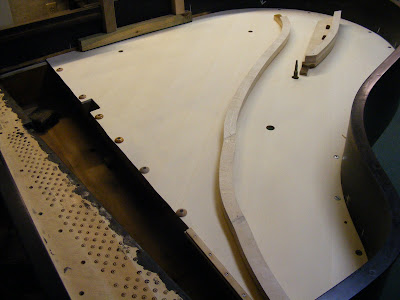
The final step before applying the finish on the top of the new soundboard is to install the trim pieces on the bass and treble side of the soundboard, and to trim the front flush with the stretcher. The trim pieces are quarter round pieces, so it requires a special caul to install them. The front of the board is planed and sanded flush with the stretcher. A final light sanding on top readies the board for it's final finish application.

Wednesday, April 29, 2009

Steinway O Soundboard Glued Into Case


At last we are ready to glue the soundboard into the case rim. It's time to stop and think through the process. Am I ready? Once the glue is applied there is no turning back. What did I forget? Do I have the needed cauls and clamps ready? Okay, I'm ready to do it. Liquid hide glue is poured into a 1/2 pint container, and I begin brushing a liberal coat of glue around the perimeter of the rim that will receive the soundboard. After I am around, I double check that I have a glossy coat of glue applied. If it is not glossy, then more glue is added. Now the new board is laid in place and the clamping begins. Starting at the front stretcher, a place the caul and 3 clamps. The 6 bind bar screws are installed. I place 4 more cauls and clamps at several spots around the perimeter. Now I begin to fill in, again starting at the front stretcher. And then around the perimeter, I fill in clamps. Clamps, clamps and more clamps, until there is a clamp about every 4-6 inches, with the cauls placed with only a small gap between. I crawl underneath and clean up the squeeze out. I then check with a mirror and flashlight that everything looks good from the bottom. Then it's time to sit down and admire your work, and breathe a sigh if relief that everything looks good. Elapsed time- about 20 minutes.

Tuesday, April 28, 2009

Steinway O Board Bottom Finished


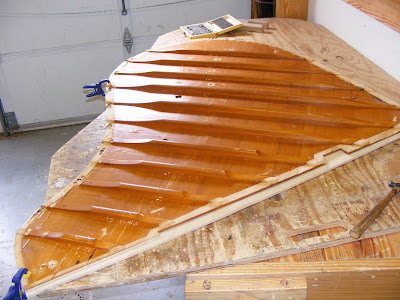
The final step in preparing the board for installation is to finish the bottom side. The top side will be finished after installation as there are several trim pieces that need to be installed. A radius is cut on the top of each rib with a special hand plane. Then the whole bottom side is sealed, sanded and masked for the final applications of lacquer. It's always fun to set the new board beside the old, and just sit back for a few minutes and enjoy the satisfaction of a completed project.

Monday, April 27, 2009

Steinway O Broken Agraffes


Standard procedure for my shop is to always replace the agraffes on any piano over 25 years old. This is especially true for older Steinways. The original shank of these agraffes are only 7/32" instead of the typical 1/4" used today. Also the seat of the agraffe is flat which means they were often over stressed at the factory at installation. Add to that the normal weakening of the metal with age, and you have a recipe for failure if they are not replaced. On this piano, something happened that I never experienced before- two agraffes broke while removing them from the plate. Typically they break when they are under tension in a strung piano. It certainly simplifies replacement when it happens in the shop, but it is still a very tedious job because it is very easy to mess up the plate when you are removing the broken stubs.

The first step is to center punch the top of the broken stub as close to center as possible. Also, apply a lubricant like WD-40. Next, very carefully drill a hole in the stub with a 5/32 drill bit. You must be very careful to stay centered as you drill completely through the stub. Drilling off center into the plate is how the plate threads get messed up. After you have drilled through the stub, a #3 easy out is used to turn the broken shank from the plate. I am very grateful that I was successful in removing both agraffes without damaging the plate.

Friday, April 24, 2009

Steinway O Bind Bar


The bind bar is a small piece of maple that is attached to the soundboard at the very treble end of the soundboard. The glue surface for attaching the soundboard to the piano is very thin at this area. The bind bar serves two purposes. First, it insures that the glue joint will not fail in that are as six screws go through the bind bar into the piano rim. Secondly, the bind bar adds some mass to that narrow part of the board, and reflects the vibrations back in the board. On many pianos the bind bar is simply a 1/4" thick piece of wood glued to the top of the board. On Steinways it is actually triangular shaped. The end of the board is cut at a 30 degree angle to accommodate the triangular shaped gluing surface. This requires some additional work and a jig for glue up, but I do believe it does make that area of the board more vibration reflective.

Thursday, April 23, 2009

Steinway O Bridges Installed On Board


In preparation for gluing the bridges onto the new board, the top of the board received it's final sanding. Then the bridge locations were hi-lighted, as well as the trim pieces. Shellac was applied to seal the board except where the bridges and moldings will be glued. Liquid hide glue is my choice for gluing bridges to the board. It has a long working time, and is easily cleaned from the bridge if it is recapped in 100 years. I put temporary screws through the dowel hole in the rib into the bridge to clamp the bridge to the board. I also press the area's between the ribs in my pneumatic press. After the glue has dried and before I remove it from the press, I install the dowels through the ribs, and into the base of the bridges. This is an exact duplication of the end result in the factory.

Wednesday, April 22, 2009

Steinway O Bridge Notching


Today I notched and installed the pins on the new bridge caps. Notching is a demanding job as you are chiseling hard rock maple. Also accuracy is critical for clean string termination that will produce a clean sound on the completed piano. Notching both bridges was about a 3 1/2 hour job.. After the notching is completed, the kerfs are sealed with schellac before the pins are installed.

Tuesday, April 21, 2009

Things Seem To Happen in Twos!

This past week has reinforced a phenomena that I have noticed through the years in my tuning experiences. It seems that things often happen in pairs. If a string breaks in one piano, I often have another one break in another piano in a relatively short time. Well, this happened to me twice within the past week. It's been a long time since I tuned a Lester Betsy Ross spinet with existing original plastic elbows (maybe several years). This week I tuned two. It has also been several years since I did a pitch raise of 200c or more, but this week I did two. It is just interesting to me now things in my world often occur in twos. Has anyone else also had this experience?

Friday, April 17, 2009

Bridges Ready For Notching


After I am satisfied that the bridge pin locations are okay on the new bridge cap, I need to prepare to drill the holes to receive the bridge pins. This is done before the bridges are notched. I use a special set of center punches to put indentations on the top of the bridge before drilling. These are 3 equally spaced punches on one tool. There are varying widths to accommodate various piano bridge designs. After the bridge pin locations have been punched, the top of the bridge is dyed black and a lubricant is placed on to of the dyed wood. Now I drill each pin hole at .003" smaller diameter than the pin being used. Ready for notching!

Thursday, April 16, 2009

Steinway O- Setting the Bearing


One of the most demanding jobs in rebuilding is setting the bearing on the new soundboard and bridge. Each rebuilder has his own formula for setting the amount of downward pressure that will be put on the soundboard. The soundboard is crowned upward, and the pressure of the strings are pressing downward. Creating the correct balance between these two opposing forces provides freedom for the soundboard to vibrate freely creating a long clear ring time for the vibrating string. This formula varies across the spectrum of the soundboard- Bass, tenor, mid section, treble, and high treble all require varying amounts of down bearing to achieve a good overall balance.

To set the bearing the bridge caps are set higher than needed, and are cut down to the desired dimension to achieve the desired bearing. The recapped bridges are dry fit onto the board, and the board is dry fit into the piano. The the plate is installed as set up with the pinblock installation. A notch is cut on the top of the bridge until the desired bearing is achieved at various sections of the bridge, When these cuts are completed, the board and bridge are removed, and the tops of the bridges are planed down to the height of the notches cut into the bridges. When this is completed, the bridge patterns are placed on the bridge, and the pin locations are transferred onto the bridge. The bridge and board are again dry fit, the plate is again installed, and the bearing is verified as desirable, and the pin locations drawn on the bridge top are checked for accuracy. When I am satisfied that every thing is where I want it, the plate, board and bridges are again removed from the piano, and I am ready to notch the bridges.

Tuesday, April 14, 2009

Pinblock Set Up


The first step in putting the Steinway back together is to install the pinblock in it's correct position. Everything else is set up after the pinblock and plate is in the correct position. This includes front to back location, side to side location and height at the bass end, height at the treble end, and height at the rear of the plate. Using the old pinblock as a pattern puts me close to the right position. The old pinblock was indexed to the plate, and the new pinblock is patterned from the same indexing marks. The plate is also indexed to the rim of the piano. Using these locator's and using recorded heights, enables me to return the plate to it's original position. There are times that for various reason, I change the plate location, but that's for another discussion.

Monday, April 13, 2009

Harp Soundboard


It's great to be able to apply some of the skills I've learned in piano rebuilding to harp construction. This past week, I built my first harp soundboard from left over sitka spruce piano soundboard material. Since the harp soundboard is thinner than a piano soundboard, it is possible to plane the thicker material to harp dimensions. This is a solid board, not laminated. I was advised against using solid spruce, but as a piano rebuilder, I can't stomach the idea of a piece of plywood being a sound board. The harp board is 1/4" thick at the bottom, and 1/8" thick at the top. The pieces of spruce were about 4" wide before gluing. Each piece was planes slightly thinner than the previous piece to achieve the taper in thickness. After the panel was glued up, the bottom was sanded flat, while the top was not only tapered from bottom to top, but the edges were also feathered. This is a true soundboard.

Easter 2009


Grandma tells Kara and Benjamin the Easter story with Resurrection eggs.


Kara in her Easter Dress


Benjamin and Karelyn dressed for the day.

Our family enjoyed a wonderful Easter celebration. Our church service included the baptism of 8 individuals, and the "cardboard" testimonies of many individuals telling of Christ's transforming power in their lives. Because He lives, we can face each day with hope and joy. Our two daughters and their families joined us for the noon meal, and an afternoon of fellowship and games. Our son and family, who live in MI was with his wife's parents in the Grand Rapids area.

Friday, April 10, 2009

Steinway O- Fitting Pinblock


The pinblock is a piece of laminated hard wood that receives the tuning pins, keeps the pins tight, but movable, and needs to withstand a total tension force of nearly 40,000 pounds. It is attached to the cast iron frame where the opposite end of the strings are attached. Therefore it is very important that the pinblock is fit properly to the plate to insure good tuning stability, and long term integrity of the pinblock. The plate is made of cast iron, which means there are irregularity's on its surface. So the pinblock must be hand fit to the flange of the plate. I also hand fit the pinblock to the web of the plate as this is often very irregular. This is a step that the majority of rebuilders ignore, but I feel is worth the extra time involve to insure the highest level of stability and integrity.

The first step is to mask off the plate web. This is necessary because I use black enamel to coat the surfaces of the web and flange, and do not want paint running through the tuning pin holes. After these surfaces are coated with a coat of paint, the rough cut pinblock is put in place and tapped . The result is black marks on the high spots of the pinblock. These high spots are sanded off, and the process is repeated.....maybe 30 times until the pinblock matches the plate to my satisfaction. The final step is to coat the face of the block with an auto body polyester filler, and clamp the pinblock to the plate under pressure. This makes a perfect match to all the irregularity's on the plate flange. This is only applied to the flange area. The end result is an assurance of longevity for the pinblock.

Wednesday, April 8, 2009

Steinway O Soundboard Pressed


After all the holes were drilled, and all the rib indexing was completed, we were ready to prepare the board for pressing. The indexed ribs were placed on the board, and lines were drawn to mark their location. The board is then sealed with schellac EXCEPT where glue joints will be. This requires a steady hand and a bit of care to keep the schellac off the wood that will be a glue joint. When every thing is gathered together, the glue up process begins. Each rib is individually glued in place using the index holes as locaters. A beam is placed on top of the rib, and 100 psi air pressure is applied. Each rib takes about 5 minutes, so this board took about 1 hour to glue up with 11 ribs. The press intentionally "bellies" the board with about 3/16" deflection on the longest ribs.

Tuesday, April 7, 2009

Harp Sound Box Glued Up


Progress on my harp project is slow,but sure! Today I glued the sound box sides to the back, and also installed the bottom. The next steps will be to install some bracing and then to make the soundboard.

Monday, April 6, 2009

Steinway O Soundboard Indexing


Before removing the old soundboard, I drilled 3 indexing hole through the old soundboard into the rim. Pins are inserted into these holes along with indexing pins that have been installed through the new ribs into the rim. I now place the fitted new soundboard panel on top of the rim, and press down to make indentations into the new board. From these indentations, the old board is placed on top of the new board, and the 3 original indexing hole are aligned with the indentations on the new board. The old board is then used as a pattern to drill all the hole in the new board, including indexing hole that were drilled to locate the bridges before they were removed from the old board. The indexing holes from the ribs are used to locate the ribs on the new board. This provides a very accurate method of locating and transferring all measurements from the old board to the new.